Why I Built This Homelab
Modern streaming culture is exhausting. Content is fragmented across too many services, each demanding money for one or two shows or films people actually care about. It’s frustrating to pay for access only to be served bloated catalogs, Marvel filler arcs, or algorithm-bait reality TV.
Self-hosted media libraries have emerged as a response to that, a way to curate a meaningful, ad-free experience. They’re often built around content that’s hard to access legally: older titles, niche genres, or region-locked releases. For many, setting up something like Plex is less about cost-saving and more about taking control.
Media self-hosting can be a form of protest.
It pushes back against a corporate model that prioritises subscriptions and ad revenue over storytelling. When content resonates, real fans often support it directly, through merchandise, physical media, or word of mouth, not passive monthly payments.
That’s why I started building my own infrastructure. It began as a simple setup, Plex on my PC with a few folders, but quickly evolved. I wanted automation, then Docker, then Linux, then monitoring, then a Minecraft server for friends.
Now, it’s a full-blown homelab. Virtualised, containerised and automated.
Evolution of the Homelab
| Stage | Details |
|---|---|
| Seed | Plex on Windows. Manual file adds. Painful. |
| Sprout | Plex + Sonarr + Radarr on Windows. Messy file paths. |
| Sapling | Moved to Proxmox VM with Debian 12. Full CLI control. |
| Tree | Docker stack: VPN-tunneled qBittorrent, smart automation, live dashboard, Discord alerts. |
Each stage taught me valuable lessons, refined my approach, and ultimately resulted in the reliable, fully automated homelab.
Phase 0: The Plan
“I’m gonna make a homelab you can’t refuse.”
Before touching a single cable or burning an ISO, I sat down and mapped out what I actually wanted from this project. Not just “install Plex,” but an intentional, modular stack that could evolve over time without collapsing under its own weight.
So I split the entire journey into phases, each with a clear goal, checklist, and rollback plan if things went sideways:
Phase Breakdown
| Phase | Goal |
|---|---|
| Phase 0: The Plan | Define requirements, map out architecture, break the build into logical stages |
| Phase 1: The Hardware | Physically assemble and verify the server; install/upgrade components and prep BIOS |
| Phase 2: The Operating System | Install Proxmox VE and configure the VM that’ll host all containers |
| Phase 3: The Docker & Containers | Build the entire stack — Plex, torrenting, automation, and more |
| Phase 4: The Network | Harden the network, configure VPNs, firewalls, subnets, and remote access |
| Phase 5: The Monitoring | Add Uptime Kuma, dashboards, alerts, logging, and uptime recovery tools |
| Phase 6: The Audit | Final checklist, cleanup, disaster recovery documentation, and postmortem |
Guiding Principles
These were the rules I forced myself to follow at every step:
- Self-contained: No reliance on third-party clouds. My server, my data.
- Recoverable: Snapshot, and document recovery paths for every service.
- Modular: Everything must run in Docker with isolated volumes, configs, and environment files.
- Secure: No exposed ports unless explicitly needed. VPN tunnel preferred. Minimal surface area.
- Documented: If it’s not written down, it doesn’t exist. Markdown logs or it didn’t happen.
- Observable: If something breaks, ensure it’s visible
Core Service List
Here’s the minimum I scoped out for v1 of the homelab:
- Plex: The heart of the project
- qBittorrent + Gluetun: Torrents tunneled through VPN
- Sonarr / Radarr / Prowlarr: Automated content acquisition
- Tautulli: Usage tracking and watched status
- Uptime Kuma: Monitor critical services
- Homepage: Self-hosted status/dashboard
- Nginx Proxy Manager: SSL and reverse proxy
- Minecraft: Because why not
- FileBrowser: Lightweight UI for browsing storage
- DuckDNS: Basic dynamic DNS for remote access
- Tailscale: Secure overlay VPN across devices
Storage Strategy
This was critical. I wasn’t going to throw media and config files on the same disk like a scrub.
| Drive | Mount Path | Purpose |
|---|---|---|
| 120GB SSD | Proxmox OS | Host the hypervisor |
| 1TB SSD (EXT4) | /mnt/ssd-linux | All Docker configs, volumes, metadata |
| 2TB SSD (NTFS) | /mnt/plex-media | Hot storage for recently added media |
| 8TB HDD (NTFS) | /mnt/hdd | Cold archive for watched or backup content |
Each one passed through cleanly to the Debian VM using scsiX raw device passthrough in Proxmox. ntfs-3g handles mount duties for the NTFS partitions in /etc/fstab.
Success Criteria
How I knew this project would be “done” (for now):
- Plex serves content instantly on LAN and remote (via Tailscale)
- Automation pulls, renames, and organises new content without manual input
- Services restart automatically after crash or reboot
- Monitoring alerts me if anything breaks — including the mover script
- Minecraft server is online, backed up, and doesn’t turn into a laggy mess
- Full disaster recovery is possible with only access to my external drives and Markdown docs
That was the blueprint.
Phase 1: The Hardware
“Say hello to my little friend… the ProDesk.”
This phase was supposed to be simple: unbox, upgrade, install. In reality? It turned into a low-level boss fight with HP’s factory screws.
Base System: HP ProDesk 400 G6 Mini
I chose this machine for a few reasons:
- Small form factor: Fits anywhere, whisper quiet
- Low power draw: Ideal for 24/7 uptime
- Surprisingly capable: 6-core, 12-thread CPU and 64GB RAM capacity
- Cheap second-hand: Plenty available from ex-corporate stock
Hardware Spec & Upgrade Plan
I wanted a future-proof homelab node that could run Proxmox and host multiple VMs + containers without breaking a sweat.
| Component | Model / Detail |
|---|---|
| CPU | Intel i5-10500T (6C/12T @ 2.3GHz) |
| RAM | 64GB DDR4 SODIMM (2×32GB Crucial 3200MHz CL22) |
| Primary Disk | 1TB Kingston NV2 Gen4 NVMe SSD |
| Backup Boot | 120GB Generic M.2 SSD (fallback boot volume) |
| External #1 | 2TB WD SN770 (hot media) via USB-C |
| External #2 | 8TB Seagate Expansion HDD (archive) via USB-A |
| Enclosure | USB-C NVMe enclosure (used for the 1TB & 2TB) |
Everything went smoothly — until I tried to swap the internal SSD.
The Screw Incident
The pre-installed 120GB M.2 SSD was locked in place with a factory-stripped screw. HP must’ve torqued it with the force of a thousand suns. I tried everything:
- Rubber bands
- Precision extraction bits
- Superglue (desperation move)
- Swearing profusely
Nothing worked. That screw wasn’t coming out without tearing the board.
At this point, I had two options:
- Destroy the 120GB SSD and force in the 1TB NVMe — risky and irreversible
- Leave the 120GB in place and install the 1TB externally in a USB-C NVMe enclosure
I chose option 2. It wasn’t ideal — but it worked. And it let me move forward without bricking the hardware on day one.
Revised Strategy
Instead of running Proxmox off the fast 1TB NVMe, I flipped the plan:
| Device | Role |
|---|---|
| 120GB SSD | Host Proxmox OS (internal, bootable) |
| 1TB SSD (EXT4) | Docker volumes, configs, Plex metadata |
| 2TB SSD (NTFS) | mount for unwatched media |
| 8TB HDD (NTFS) | Cold storage for watched media / backups |
All external drives passed through to the docker-host VM using Proxmox raw device passthrough (scsiX: /dev/sdX,format=raw). This gave the VM native block-level access to each disk.
Cooling Considerations
With an NVMe drive running full-time in a plastic USB-C enclosure, I added:
- Low-profile thermal pads inside the case
I don’t want my main Docker volume drive thermal throttling mid-transcode.
BIOS Tweaks
To prep for virtualization and passthrough, I adjusted:
- VT-x and VT-d: Enabled
- Secure Boot: Disabled
- Legacy Boot: Disabled
- Boot Priority: Set to internal 120GB SSD
What Worked / What Didn’t
| What Worked Well | What Was a Nightmare |
|---|---|
| Upgrading RAM to 64GB | Swapping the internal SSD |
| USB passthrough for Docker volumes | Thermal throttling risk on NVMe over USB-C |
| BIOS config for VT-x / VT-d | HP’s anti-human screw design |
| Modular drive setup with fstab | NTFS quirks on cold storage drives |
Lessons from Phase 1
- Always test drive mounts with
UUIDandfstabbefore assuming they’ll survive a reboot - Avoid gluing anything inside your PC unless you hate yourself
- 64GB RAM might be overkill
- USB-C NVMe is surprisingly fast (~900MB/s) but nowhere near native Gen4 speeds
With the hardware stable, drives mounted, and BIOS dialed in, I was finally ready to install the hypervisor and start spinning up VMs.
Phase 2: The Operating System
“Yer a wizard, Debian.”
With the hardware finally stable (screw rage behind me), it was time to give this machine a brain.
There were many ways I could’ve gone here; bare metal Docker, Windows Server, Unraid, TrueNAS… but I wanted:
- Virtualisation support for running multiple isolated environments
- A strong CLI and community
- Total control over storage, snapshots, and PCI passthrough
There was only one option that hit all the marks without being bloated: Proxmox VE.
Why Proxmox?
- Free, open-source hypervisor
- Clean web UI + full CLI access
- Built-in support for raw disk passthrough
- Powerful snapshot/backup tools
- Debian-based
Installation Checklist
OS: Proxmox VE 8.1
Install Method: Flashed ISO via Rufus → Booted from USB
Target Disk: Internal 120GB SSD
Post-Install Tasks:
- Set static IP to
192.168.0.x(reserved via router DHCP) - Disable subscription nags (
sed+ APT patch) - Rename node to
homelab - Enable remote SSH access
- Create non-root user for SSH
# Confirm node config
pveversion -v
Proxmox Configuration Recap
| Setting | Value |
|---|---|
| Hostname | homelab |
| Management IP | 192.168.0.X (static) |
| Web UI | https://192.168.0.X:8006 |
| Subscription Popup | Disabled |
VM Planning
My philosophy here was “one VM to rule them all”, but only if that VM was solid. I didn’t want 15 micro-VMs doing niche tasks badly.
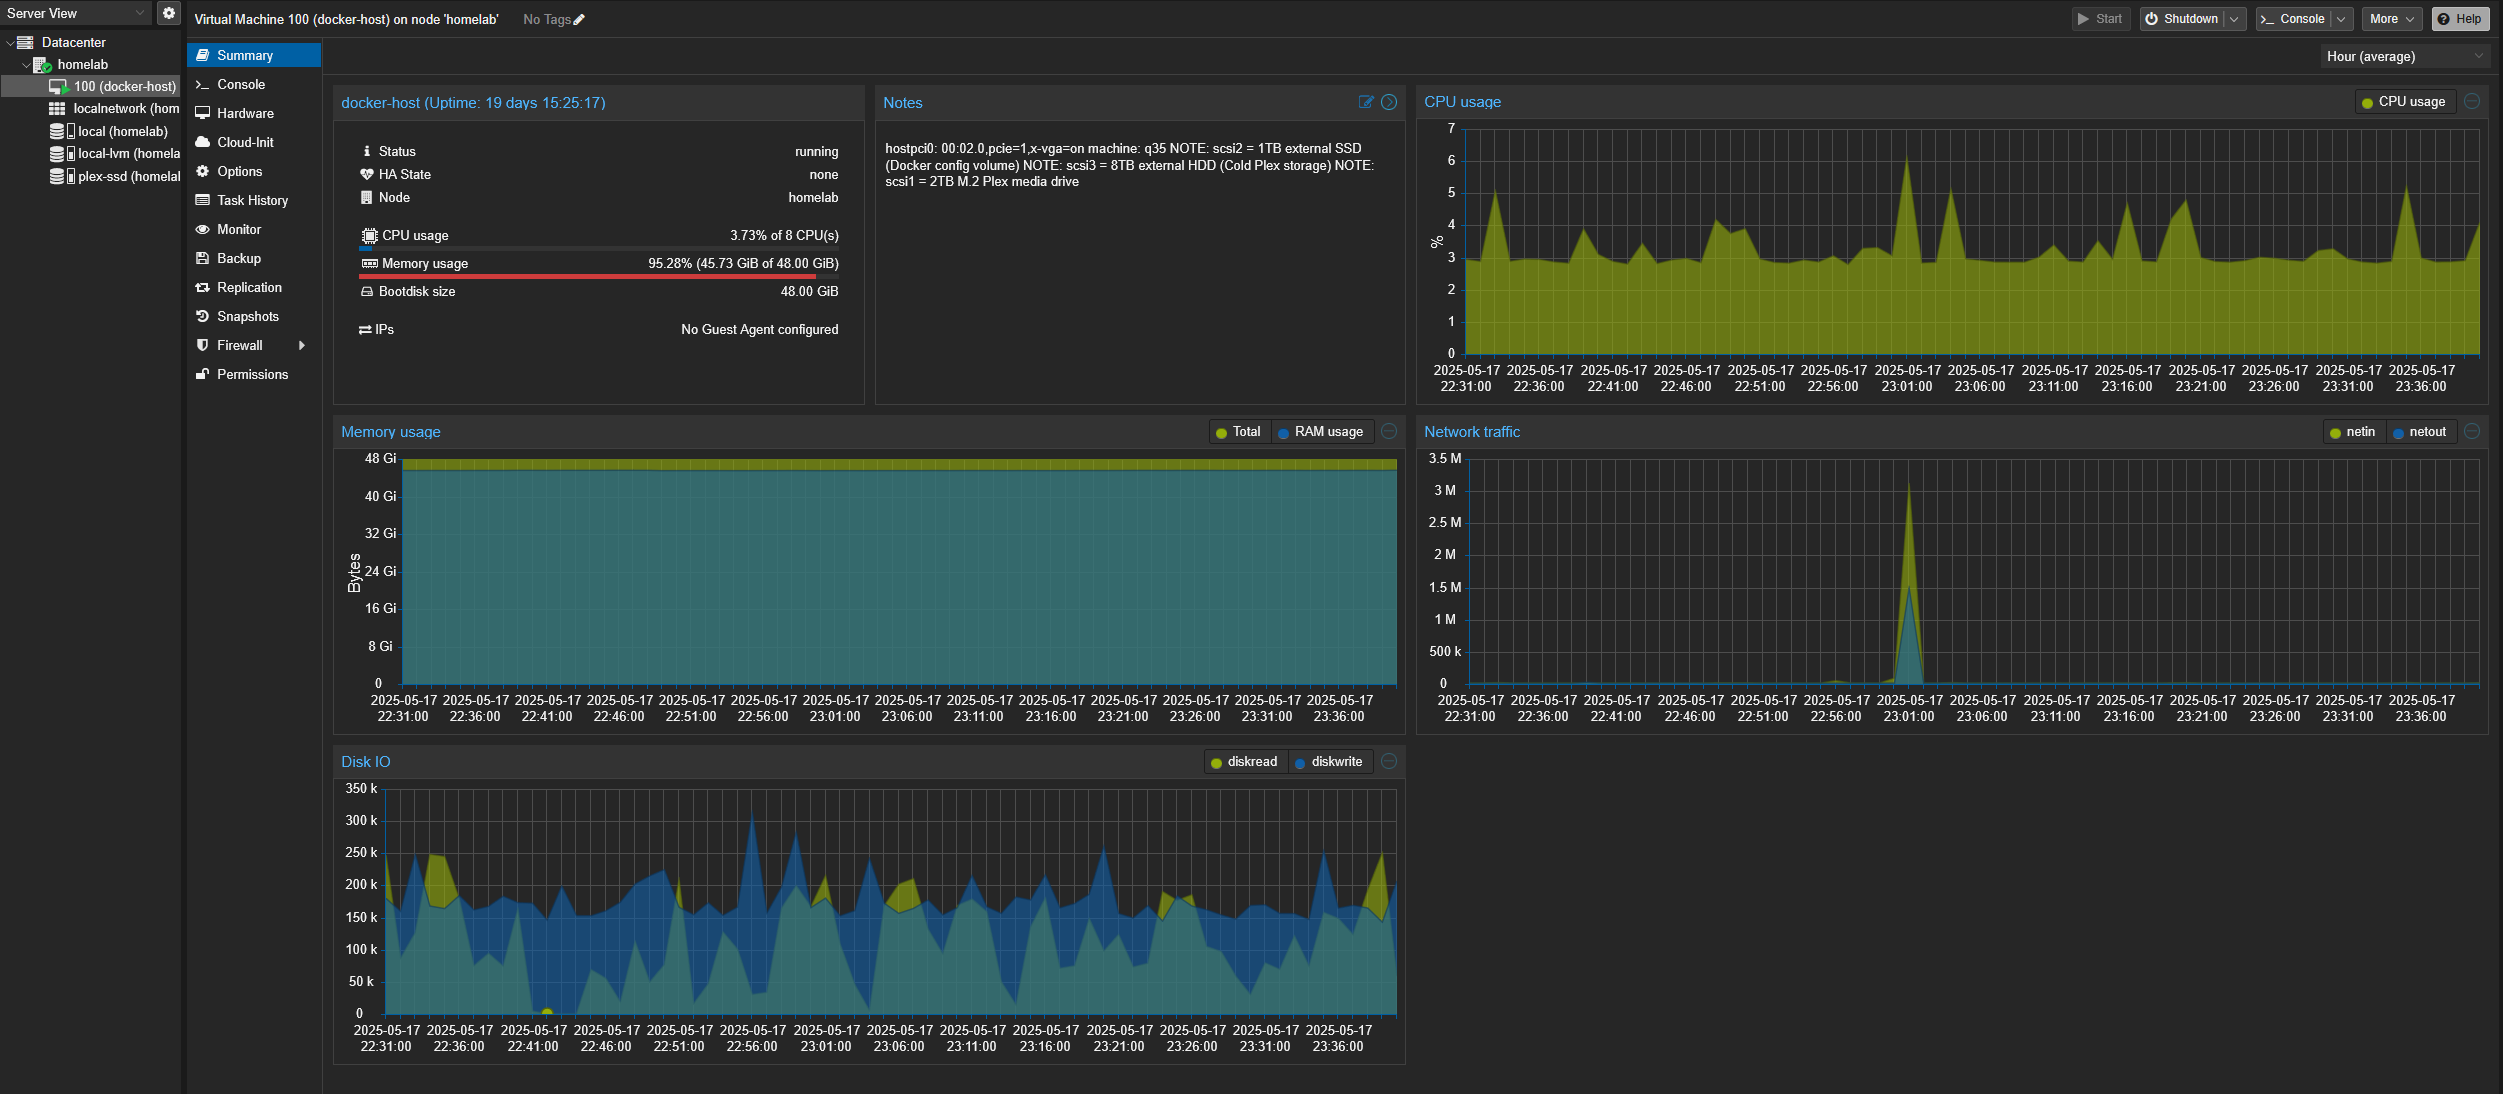
Primary VM: docker-host
| Spec | Value |
|---|---|
| OS | Debian 12 (Bookworm, minimal install) |
| vCPU | 8 cores |
| RAM | 48GB |
| Disk (internal) | 48GB on Proxmox SSD |
| Mounts | 1TB EXT4 (/mnt/ssd-linux), 2TB NTFS (/mnt/plex-media), 8TB NTFS (/mnt/hdd) |
| IP Address | 192.168.0.X (static via DHCP) |
Minimal Debian Install Notes
Debian was installed manually using the netinst ISO.
Installed only:
- OpenSSH server
- sudo
- curl, wget, git, htop, rsync
- ntfs-3g for media drives
- Docker CE + Docker Compose v2 (installed via apt repo)
I avoided the Desktop Environment, Snap packages, or any auto-magic config. Keep it lean.
sudo apt update && sudo apt upgrade -y
sudo apt install docker.io docker-compose -y
Drive Mounts via fstab
Mounts were UUID-based and cleanly defined for permanence across reboots.
# /etc/fstab entries (UUIDs redacted)
UUID=xxxxxx /mnt/plex-media ntfs-3g defaults 0 0
UUID=yyyyyy /mnt/ssd-linux ext4 defaults 0 2
UUID=zzzzzz /mnt/hdd ntfs-3g defaults 0 0
All drives were passed through from Proxmox using raw disk passthrough (scsiX) to give the VM full block access.
Sanity Checks Before Moving On
- VM boots cleanly
- SSH access stable (ssh XXXX@docker-host)
- All 3 drives auto-mount and are writable
- docker ps and docker compose run fine
- Static IP reachable via LAN
- fstab doesn’t hang at boot
- /etc/hosts and /etc/hostname match
- UFW firewall installed and tested
Observations from Phase 2
| Good Decisions | Could’ve Been Better |
|---|---|
| Using Debian minimal install | Should’ve pre-written fstab entries to avoid a reboot cycle |
| SSH from day 1 | Consider setting up earlier for convenience |
| Single powerful VM | Might need to split in future if resource contention appears |
| Using EXT4 for Docker configs | NTFS was not fun to script across |
Phase 3: The Docker & Containers
“Dock Hard”
With Debian installed and the drives mounted, it was finally time to start building the real infrastructure. This is where the homelab went from “just a VM” to a full service stack.
Why Docker?
Because I’m not interested in:
- Manually setting up services
- Dealing with conflicting dependencies
- Running a script and praying it survives a reboot
Docker gives me:
- Isolation: Every service lives in its own box
- Portability: Move everything by copying one folder
- Repeatability: Rebuild my entire stack in seconds
- Observability: Every container has logs, healthchecks, and restart policies
And most importantly: Docker Compose lets me define the entire stack in one YAML file.
Folder Structure
All containers live under /mnt/ssd-linux/docker, which sits on the 1TB EXT4 SSD passed through to the VM. It’s clean, fast, and not affected by NTFS permission weirdness.
/mnt/ssd-linux/
└── docker/
    ├── compose.yml
    ├── plex/
    ├── tautulli/
    ├── qbittorrent/
    ├── gluetun/
    ├── sonarr/
    ├── radarr/
    ├── prowlarr/
    ├── homepage/
    ├── uptime-kuma/
    ├── filebrowser/
    └── scripts/
Core Stack: Docker Compose Services
Here’s a trimmed snapshot of what my docker-compose.yml looked like during this phase:
version: "3.9"
services:
  plex:
    image: lscr.io/linuxserver/plex
    network_mode: host
    volumes:
      - ./plex:/config
      - /mnt/plex-media:/movies
    environment:
      - PUID=1000
      - PGID=1000
      - VERSION=docker
      - TZ=Europe/London
    restart: unless-stopped

  gluetun:
    image: qmcgaw/gluetun
    cap_add:
      - NET_ADMIN
    devices:
      - /dev/net/tun
    environment:
      - VPN_SERVICE_PROVIDER=pia
      - VPN_TYPE=wireguard
      - SERVER_CITIES=Amsterdam
    volumes:
      - ./gluetun:/gluetun
    restart: unless-stopped

  qbittorrent:
    image: linuxserver/qbittorrent
    network_mode: "service:gluetun"
    depends_on:
      - gluetun
    environment:
      - WEBUI_PORT=8082
    volumes:
      - ./qbittorrent:/config
      - /mnt/plex-media/downloads:/downloads
    restart: unless-stopped
Services Deployed
| Service | Port(s) | Notes |
|---|---|---|
| Plex | 32400 | Core media server. Runs in host mode for LAN discovery & DLNA. |
| qBittorrent | 8082 (via VPN) | Web UI tunneled through Gluetun (PIA WireGuard). |
| Gluetun | — | VPN container (PIA, WireGuard). Tunnel for torrent + indexers. |
| Sonarr | 8989 | TV automation. Behind Gluetun VPN. |
| Radarr | 7878 | Movie automation. Behind Gluetun VPN. |
| Prowlarr | 9696 | Indexer manager. Behind Gluetun VPN. |
| Tautulli | 8181 | Plex stats and activity tracker. |
| Homepage | 3005 | Custom homelab dashboard. Internal only. |
| Uptime Kuma | 3001 | Status monitoring. Internal only. |
| FileBrowser | 8085 | Lightweight file manager. Internal only. |
| DuckDNS | — | Dynamic DNS. Updates external IP for domain access. |
| Minecraft | 25565 | Hosted LAN game server. Publicly exposed |
| Nginx Proxy Manager | 80 / 443 | GUI reverse proxy. |
| Tailscale | — | Private overlay network for remote SSH/management. |
| FlareSolverr | 8191 | Captcha solver for Prowlarr. Routed via Gluetun. |
| Netdata | 19999 | Real-time system monitoring. Internal access only. |
| Portainer | 9000 | Docker management GUI. Internal only. |
VPN Enforcement (Gluetun)
Torrenting is routed entirely through a VPN using Gluetun with PIA + WireGuard.
Why PIA?
- Port forwarding support (Mullvad and Surfshark do not, reliably)
- Stable IP handoff
- Easy config
docker exec -it gluetun curl ifconfig.me
# → Confirms VPN IP
The torrent containers (qBittorrent, FlareSolverr, Prowlarr) all run inside Gluetun’s network namespace, meaning they literally cannot reach the internet unless the VPN tunnel is healthy.
Healthchecks
- Containers like Gluetun have built-in healthchecks
- Others (e.g. Plex, Sonarr) are monitored externally by Uptime Kuma
- Restart policies are set to
unless-stopped - Cronjobs handle watchdog behavior for mover scripts and backups
Sanity Checks After Deployment
| Check | Command |
|---|---|
| Docker status | docker ps -a |
| Disk I/O | iotop, df -h, lsblk |
| VPN leaks | docker exec gluetun curl ifconfig.me |
| Plex metadata health | Verified via web UI + Tautulli |
| Volume mounts | `mount |
| Firewall scope | sudo ufw status (inside VM) |
Lessons Learned
| Good Decisions | Problems Encountered |
|---|---|
| Isolating containers per directory | NTFS-mounted folders caused UID/permission issues |
| Using Gluetun with qBittorrent | VPN took longer to start — needed depends_on and sleep loop |
Moving all configs to /mnt/ssd-linux | Accidentally ran a test compose from /root and duplicated configs |
Using network_mode: host for Plex | Broke Kuma monitor until I fixed the port mapping logic |
Status After Phase 3
Phase 3 turned a VM into a self-sustaining, observable stack of services. Everything now runs in Docker, isolated, and configured to survive restarts and minor failures without intervention.
Phase 4: The Network
Now that the Docker stack was humming along, it was time to address my nemesis.
Networking is where most people go overboard — VLANs, dual-NIC bonding, multi-subnet segmentation, and a firewall that requires a PhD. That’s not this setup. I wanted secure, observable, and boring. Boring is good.
Goals for Networking
- LAN access to all services without port collisions
- Remote access (secure) for Plex, Plexamp, and Minecraft
- VPN tunneling for torrenting only — not the whole VM
- No double-NAT, no exposed admin panels
- Monitoring and healthchecks from any device, anywhere
Baseline Network Layout
[Internet]
   │
[ISP Router]
   ├── 192.168.0.X → Proxmox (homelab)
   └── 192.168.0.X → Debian VM (docker-host)
- DHCP reservations for both Proxmox and the Docker VM
- No static IPs hardcoded in OS — all managed by router bindings
- Network mode for containers: mixed (
hostfor Plex, bridge for most others)
Tailscale: The Remote Access Backbone
Tailscale is a zero-config WireGuard overlay that just works.
Why Tailscale?
- No port forwarding required
- Works behind NAT and CGNAT
- Every device gets a stable private IP
- Supports MagicDNS for easier SSH (
proxmox.ts.net) - Share access securely to friends or devices (ACLs)
tailscale up --authkey tskey-...
tailscale status
This replaced the need for OpenVPN or exposing sensitive ports to the public web.
DDNS via DuckDNS
For services I did want externally exposed (Plex, Minecraft), I set up a free DuckDNS subdomain:
- Domain:
raw-tech.duckdns.org - Token stored in
.envfile for the container - Updates automatically on IP change via the DuckDNS container
Nginx Proxy Manager
Some services needed SSL and custom hostnames, but I didn’t want to maintain Nginx by hand. NPM provided:
- GUI-based reverse proxy setup
- LetsEncrypt SSL certs with auto-renew
- Granular access control
- Simple subdomain routing to Docker services
Used only for:
- Plex (HTTPS via Cloudflare DNS validation)
- Minecraft
Everything else remains LAN-only behind Tailscale.
UFW Firewall Rules
Firewall is enforced inside the Debian VM using UFW.
Network Monitoring
- Uptime Kuma monitors external endpoints (DuckDNS)
- qBittorrent Gluetun container pings
ifconfig.meto validate VPN IP - Discord alerts if the VPN IP ever goes down
- Kuma dashboard includes TCP port monitors for Plex, Minecraft, SSH
Lessons from Phase 4
| Service | Could’ve Been Better |
|---|---|
| Tailscale for remote access | Took trial-and-error to route Plex properly |
Status After Phase 4
- Plex, Minecraft reachable externally over HTTPS
- All other services only accessible via LAN or Tailscale
- Firewall restricts all unexpected inbound traffic
- Remote access works without port-forwarding hell
- VPN tunnel validates torrent container IP on boot
- Nothing is open to the public that shouldn’t be
Phase 5: The Monitoring
“I’m always watching, Wazowski.”
I wanted eyes on everything: uptime, disk space, container health, and remote access status.
Monitoring Goals
- Track availability of every container (and the VM itself)
- Detect VPN leaks or tunnel failures
- Get alerts if Plex, Sonarr, or automation tools go offline
- Keep historical logs for debugging
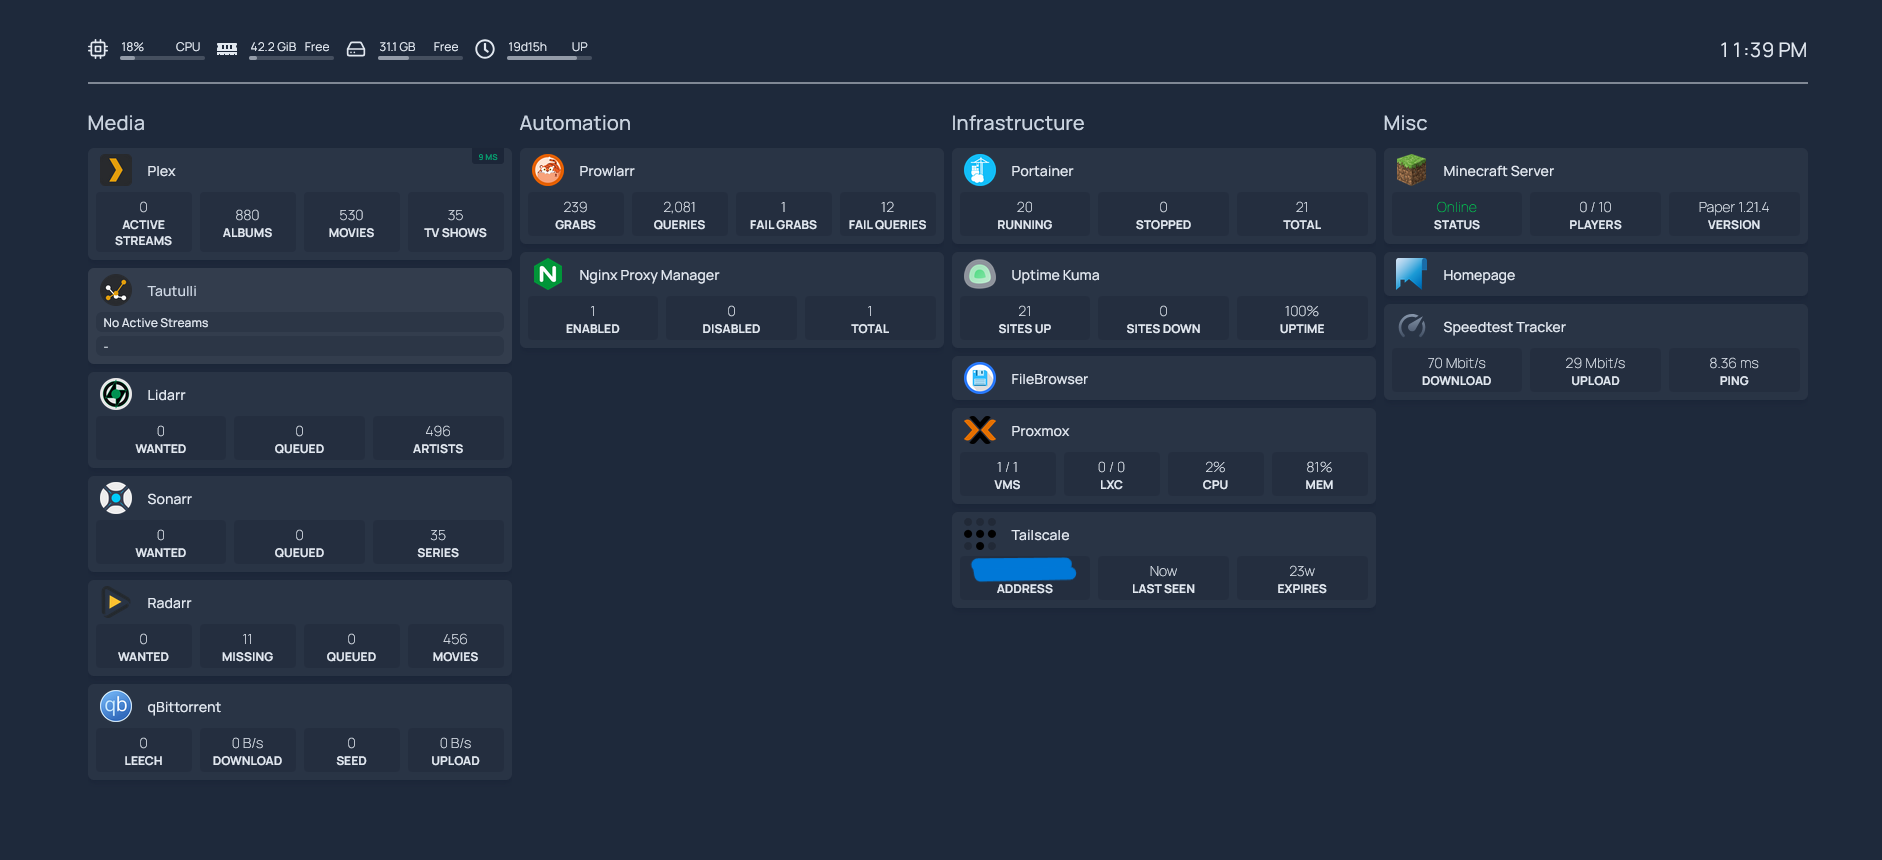
Homepage
Homepage acts as a simple self-hosted dashboard to:
- Display current container statuses
- Link to all local services
- Show system info (disk, uptime, memory)
- I did try Heimdall but I prefer Homepage’s YAML-based config
Mounted at /mnt/ssd-linux/docker/homepage/, the config is stored in:
/mnt/ssd-linux/docker/homepage/
├── config/
│   ├── services.yaml
│   ├── bookmarks.yaml
│   ├── settings.yaml
│   └── widgets.yaml
Accessible at http://192.168.0.X:3005
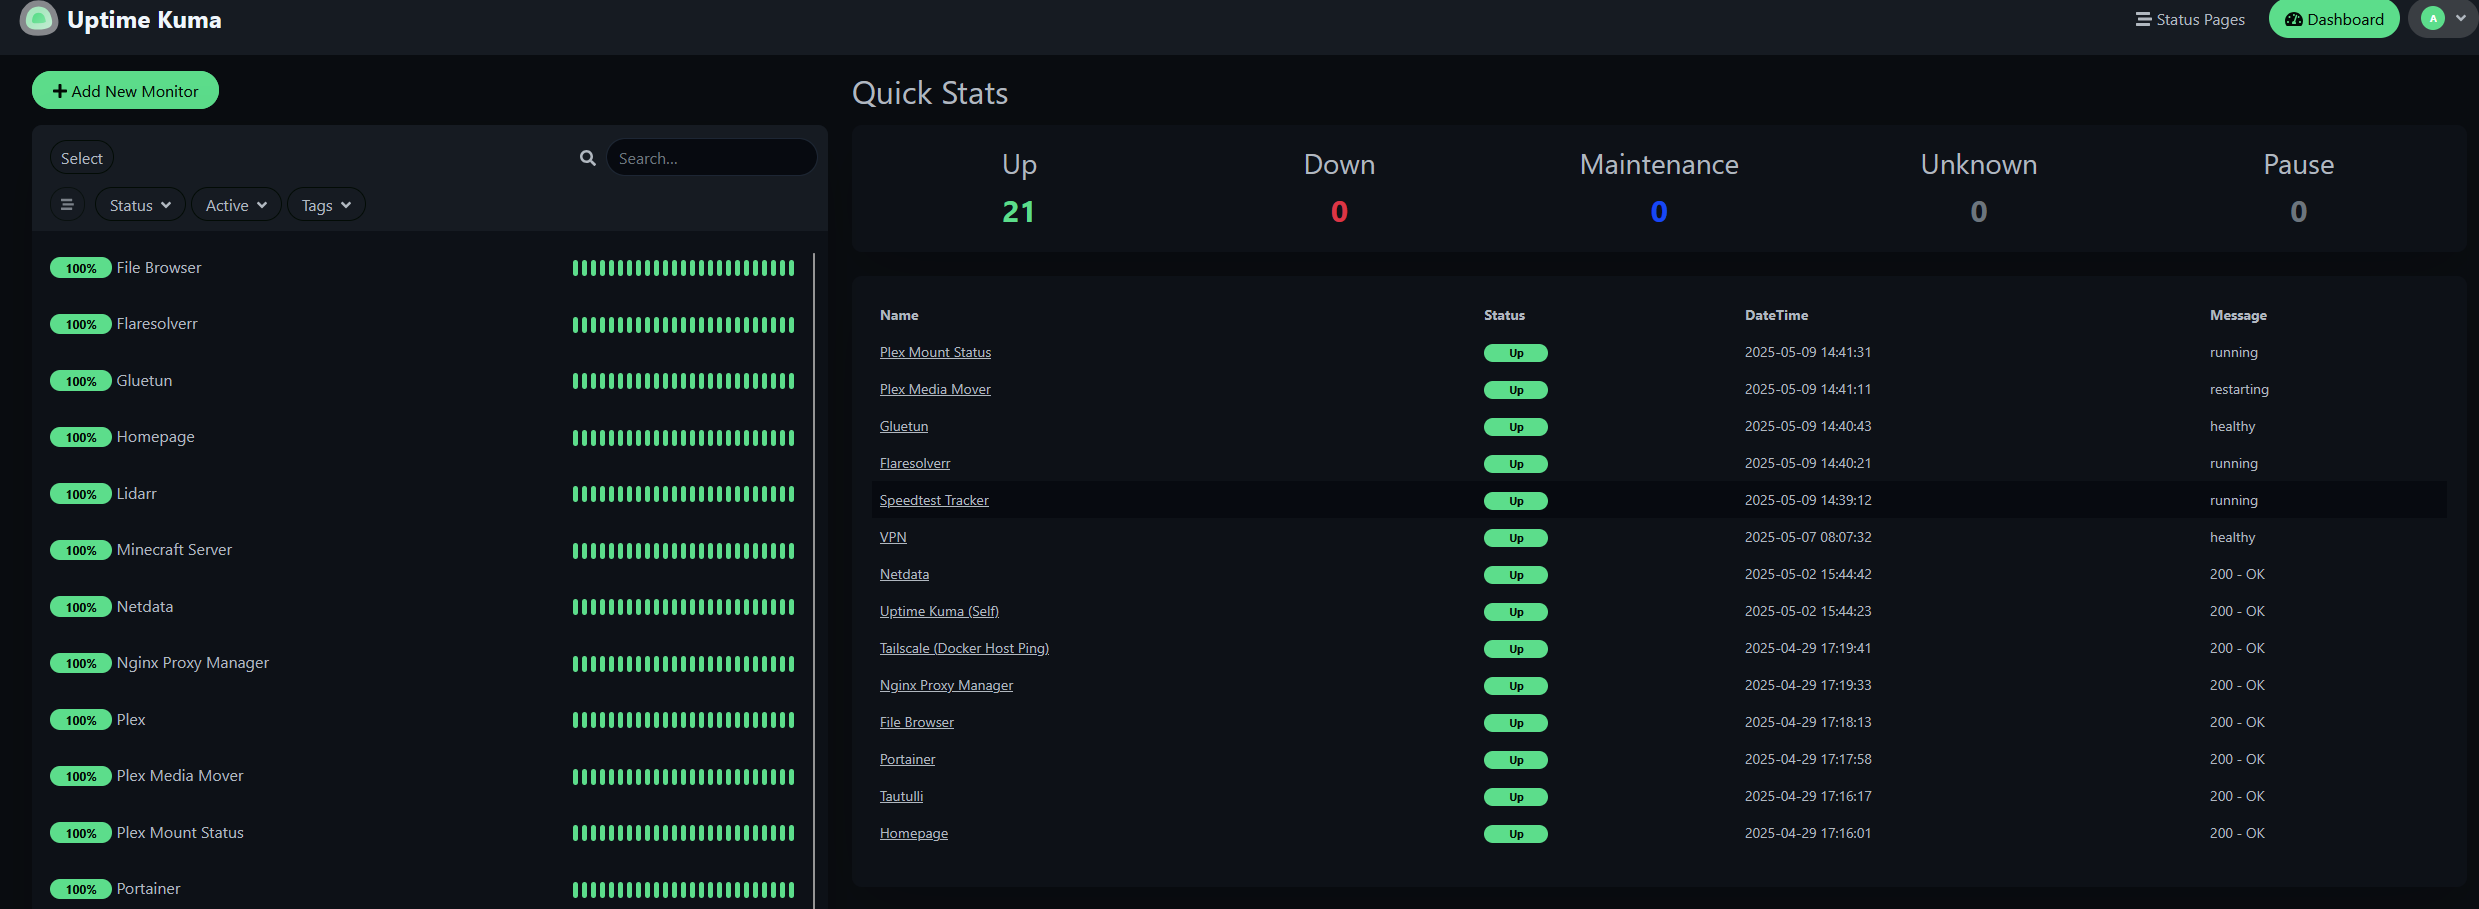
Uptime Kuma
Uptime Kuma tracks container availability via:
- TCP port probes
- HTTP endpoint checks
- API integrations (e.g. Plex, Sonarr, Radarr)
- External DuckDNS URLs (to validate remote exposure)
Accessible at http://192.168.0.X:3001
Kuma database is stored at:
Monitored Services
| Service | Type | Target |
|---|---|---|
| Plex | HTTP | /status/sessions?X-Plex-Token |
| Sonarr | API (JSON) | /api/system/status |
| Radarr | API (JSON) | /api/system/status |
| qBittorrent | TCP | Port 8082 |
| Minecraft | TCP | Port 25565 |
| Filebrowser | HTTP | Port 8085 |
| Tailscale VPN | Shell | curl ifconfig.me via Gluetun |
| SSH | TCP | Port 22 |
Discord Notifications
Both Uptime Kuma, Plex watch status (Tautulli) and custom cronjobs send alerts via Discord webhook.
Sample mover script alert:
curl -X POST -H "Content-Type: application/json" -d '{"content":"✅ Plex mover ran. 12 files moved."}' $DISCORD_WEBHOOK
Kuma also uses the same webhook to send alerts for downed or restored services.
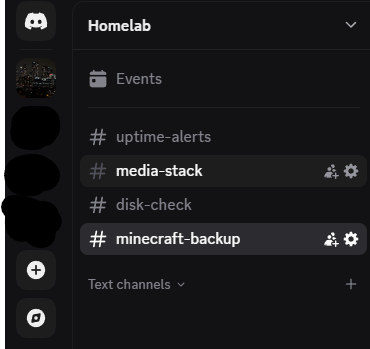
Log Management
- All script logs are dumped to
/mnt/ssd-linux/logs/ - Mover script log:
plex-mover.log - Minecraft backup log:
minecraft-backup.log - Logrotate compresses old logs daily and rotates after 7 days
Sample crontab entry:
0 * * * * /mnt/ssd-linux/scripts/plex-mover.sh >> /mnt/ssd-linux/logs/plex-mover.log 2>&1
Lessons from Phase 5
| Win | Problem Solved |
|---|---|
| Using Kuma instead of Grafana stack | Avoided overengineering |
| External uptime for DuckDNS URLs | Detected DNS propagation issues early |
| Discord webhooks | Instant visibility on automation status |
| Homepage YAML config | Easy to update, no GUI needed |
Status After Phase 5
- Every critical service monitored for uptime
- Discord alerts sent on all failures or mover script completions
- Web dashboards live at
3001(Kuma) and3005(Homepage) - VPN IP validated and verified on boot
- Historical logs available for analysis
Phase 6: The Audit
“You either die a hero, or live long enough to run your own compliance check.”
At this point, everything worked. But working isn’t the same as being reliable. That’s where the audit came in. A full walkthrough of every component, permission, port, and config.
This wasn’t just about validating what I had built. It was about documenting it so Future Me, or anyone else, could recover, debug, or upgrade the system without starting from scratch.
Audit Objectives
- Ensure all mount points persist across reboots
- Confirm correct container state, health, and restart behavior
- Validate firewall rules and VPN isolation
- Test remote access and DNS resolution
- Backup critical configs and volumes
- Generate a readable, re-runnable DRP (Disaster Recovery Plan)
Filesystem & Mounts
All drives are mounted via UUID using /etc/fstab.
UUID=xxxxxx /mnt/plex-media ntfs-3g defaults 0 0
UUID=yyyyyy /mnt/ssd-linux ext4 defaults 0 2
UUID=zzzzzz /mnt/hdd ntfs-3g defaults 0 0
Checked using:
lsblk
mount | grep /mnt
df -h
Docker Healthcheck
docker ps -a
docker compose ps
docker ps --filter 'status=restarting'
Confirmed:
- No containers stuck in restart loops
- Plex, Sonarr, Radarr, Tautulli reachable on LAN
- Config directories are writable and not root-owned
- Gluetun VPN container routes traffic securely
VPN + Network Verification
Verified Gluetun’s tunnel IP:
docker exec gluetun curl ifconfig.me
Also verified:
- Plex remote access works over Tailscale
- Minecraft is externally reachable (via DuckDNS + port 25565)
- Uptime Kuma shows correct up/down history for every container
- No admin panels exposed to WAN
Firewall Rules (UFW)
Checked with:
sudo ufw status numbered
Confirmed:
- Only required ports are exposed externally
- All other ports limited to LAN or Tailscale subnet
Backup Strategy
- Plex metadata stored under
/mnt/ssd-linux/plex/ - Minecraft world backed up to tar.gz weekly
- Kuma DB backed up manually and versioned
- Docker volume configs backed up to
/mnt/hdd/docker-backup/using rsync
rsync -avh /mnt/ssd-linux/ /mnt/hdd/docker-backup/
Disaster Recovery Procedures
- Proxmox snapshot or fresh install
- Restore VM or rebuild from clean ISO
- Reattach drives, verify mount points
- Reinstall Docker and Compose
cd ~/docker && docker compose up -d- Validate Plex, automation tools, VPN, Kuma
- Restore Minecraft
- Resume cronjobs and verify Discord alerts
Lessons from Phase 6
| Good Habits | Pain Avoided |
|---|---|
| fstab + UUIDs | No boot hangs or missing drives |
| Documented firewall rules | Easy auditing + validation |
| Verified VPN tunnel at boot | No torrent leaks |
| rsync for Docker configs | Instant container recovery |
Status After Phase 6
- Infrastructure fully audited and documented
- Mounts and configs persist after full shutdown
- Backups exist and are restorable
- Containers and VPN behave as expected
- Nothing is exposed that shouldn’t be
- Disaster recovery validated on paper and in practice
The stack is now reliable, recoverable, and repeatable.
Project complete.
Final Thoughts
What started as a way to escape the chaos of modern streaming became a deep dive into infrastructure, automation, and self-reliance. Plex was just the spark. The real fire came from building the ecosystem, the orchestration, the failure handling, the why behind the how.
I’d written plenty of PowerShell before, mostly quick automations, task schedulers, file movers. But Linux is a different world. It demands precision. It punishes sloppiness. But it rewards patience, curiosity, and discipline. This was my first proper foray into that world.
It’s also personal. I don’t want my media held hostage by cloud outages or licensing changes. I want a system that runs on my terms. No ads. No logins. No “now available with premium.” Just content I care about, delivered how and when I want it.
I didn’t build this homelab out of necessity. I built it because I was tired of friction. Every script solved an annoyance. Every cronjob eliminated a chore. What began as a one-off Plex box became a platform, resilient, monitored, automated.
The wiring is messy. The screw’s still stripped. But the system works. It monitors itself. It alerts me. It’s documented. It’s fast. And above all: This one’s mine.